
Contents
- 1 How to install HA on Raspberry
- 2 How to find your HA in your LAN
- 3 Install a text editor in Home Assistant for edit it’s files
- 4 Change the background colour of HA
- 5 Save your HA configuration
- 6 Advanced Mode
- 7 Editing HA home page (and install the Coronavirus statistics)
- 8 Insert a new driver for pilot your intelligent device
- 9 Home Assistant APP
- 10 Add-ons or Plug-in (deCONZ drive installation for ZigBee)
- 11 Turn Off your Raspberry/HA
- 12 ConBee II, ZigBee USB Gateway
- 13 How to integrate Osram Smart+ (LED bulb Zigbee) in Home Assistant
- 14 SHELLY 1 how to use it
- 15 XIAOMI Temperature and Humidity sensor
- 16 XIAOMI Motion Sensor (PIR sensor)
- 17 XIAOMI Mi Windows and Doors Sensor
- 18 Third party add-on or plug-in for Home Assistant (HA)
- 19 Introduction to Home Assistant (HA) Automations
- 20 How to enable some automation only during the night
- 21 XIAOMI – AQARA, sensors & actuators + ConBeeII ZigBee gateway
- 22 File Editor
- 23 Remotely access to Home Assistant (from Internet)
How to install HA on Raspberry
See our tutorial that is here.
How to find your HA in your LAN
The RASPBERRY PI must be connect to an Ethernet cable and Power On.
At this point open a browser (on a PC) and type:
hassio.local:8123
If all is OK you must see the first page of your HA.
ATTENTION:
Some router don’t support the address: hassio.local:8123
if you are in this situation do this:
- Find manually the IP of your HA using for example:
- On Android use the: FING
- On Linux use the: NMAP
- On Windows use the: Angry IP Scanner (Free)
When you find your IP of HA on the browser write the IP, for example: http://192.168.0.11:8123/
In this case the 192.168.0.11 is the IP of our HA.
Install a text editor in Home Assistant for edit it’s files
See our tutorial that is here.
Change the background colour of HA
See below.
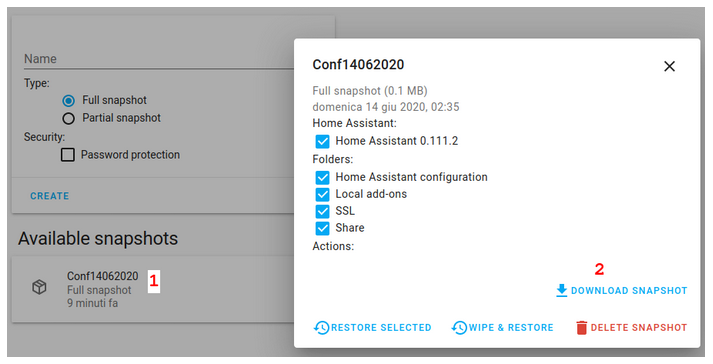
Save your HA configuration
For save your configuration select:
SUPERVISOR -> Snapshots
see below.
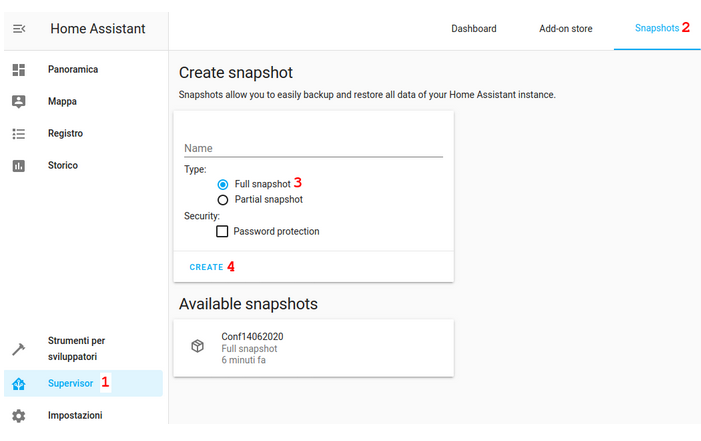
In the new window that appear follow the steps below.
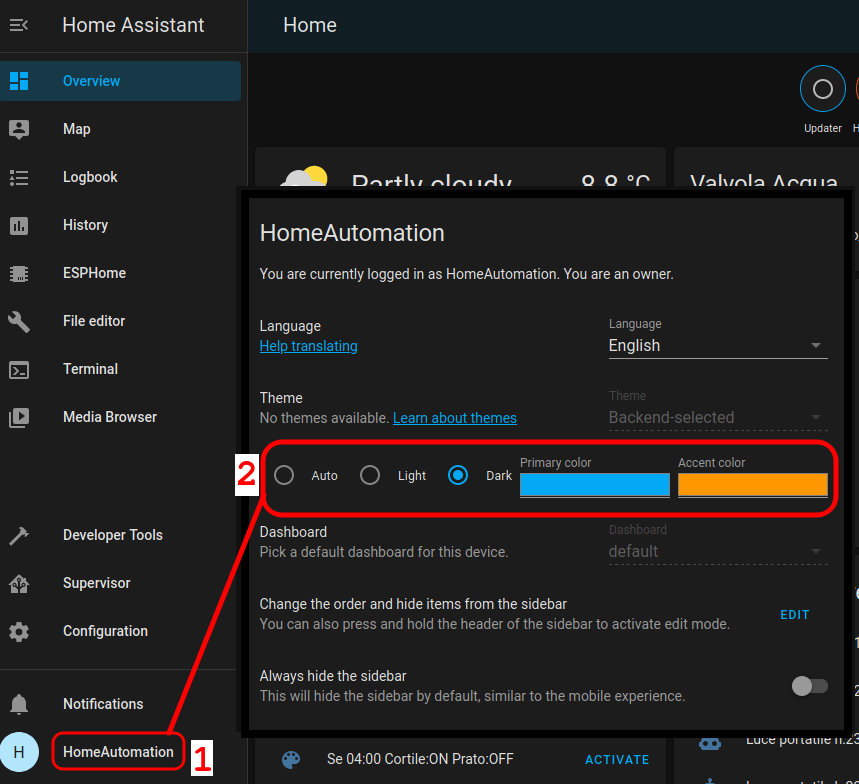
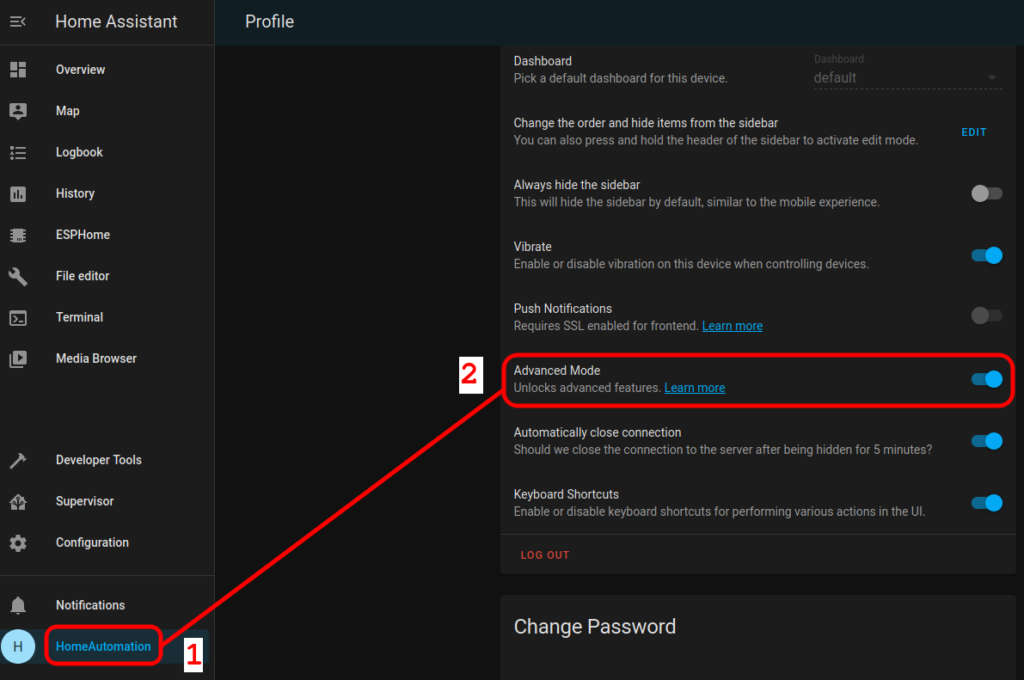
Advanced Mode
Advanced Mode is important for have a full control of our HA.
See the image below.
For change the configuration of your HA home page you must follow the steps below.
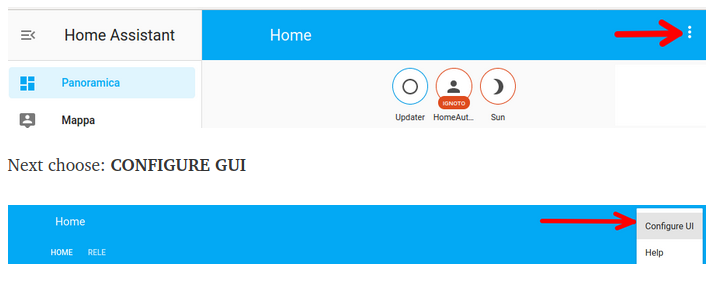
From the page that appears press the+button.

Now suppose to want to see the Worldwide Coronavirus deaths, you must follow the steps below.
First you must install the Corona Virus statistics.
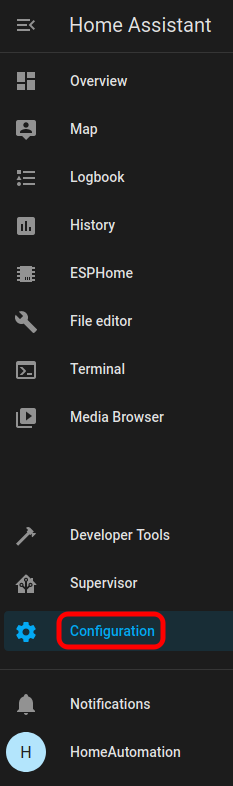
For do this click on CONFIGURATION, see below.
From the page that appears click the button: ADD INTEGRATION

and search Coronavirus and add it.
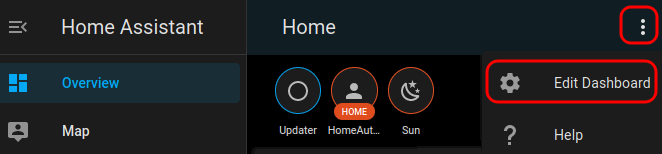
Now back to: OVERVIEW
and press on the three dots present on top right of the page and click on:
EDIT DASHBOARD, see below.
Now press the button ADD CARD

From the page that appears select: SENSOR
in ENTITY choose: Worldwide Coronavirus Deaths(sensor.worlwide.croronavirus.deaths)
and set Hours to Show (Optional) to 250
and SAVE it, see below.

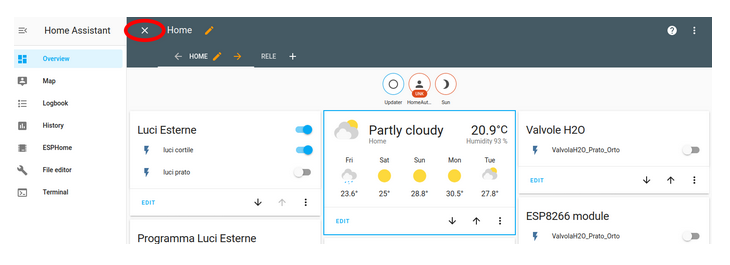
For exit from this menu click on X, see below.
Insert a new driver for pilot your intelligent device
If you need to connect a new device to your HA is necessary insert an appropriate driver, for do this select CONFIGURATION icon, see below.

Next, from the page that appears, press on the: ADD INTEGRATION, see below button.

At this point you must add new drive or service to your HA home page.
See also here, or our example below.
Add a new Device or Entity in your Home Page (Overview) of HA
For explain how to do we assume that you has installed on your smart phone (SP) the HA App and we assume that you had enabled the SP battery sensors (see here).
For add in your home page of HA the status of the battery of your mobile phone do the steps below.

From the page that appears press on the + button, see below.

From the page that appears select GAUGE and from the new page that appears choose your mobile phone battery level, see below.
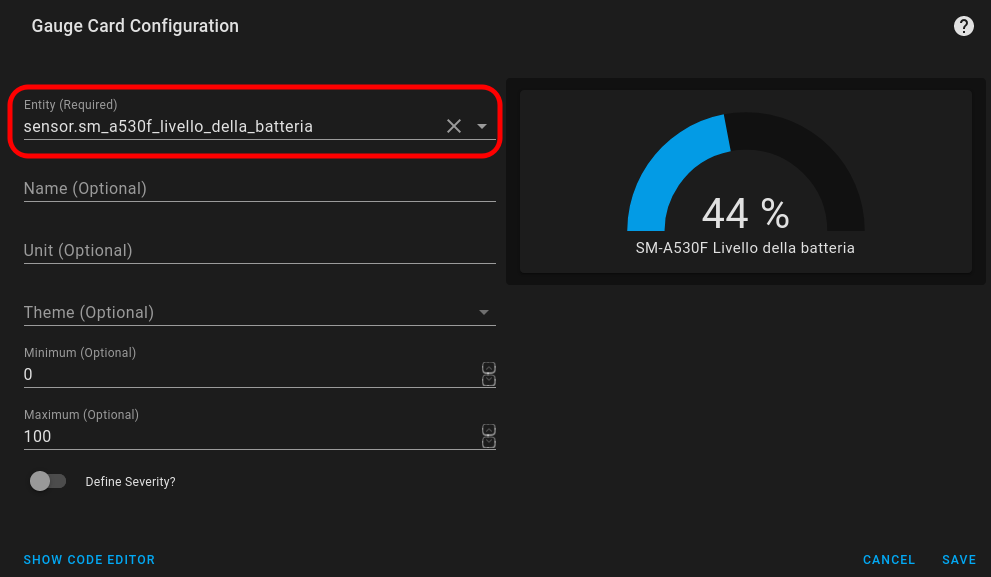
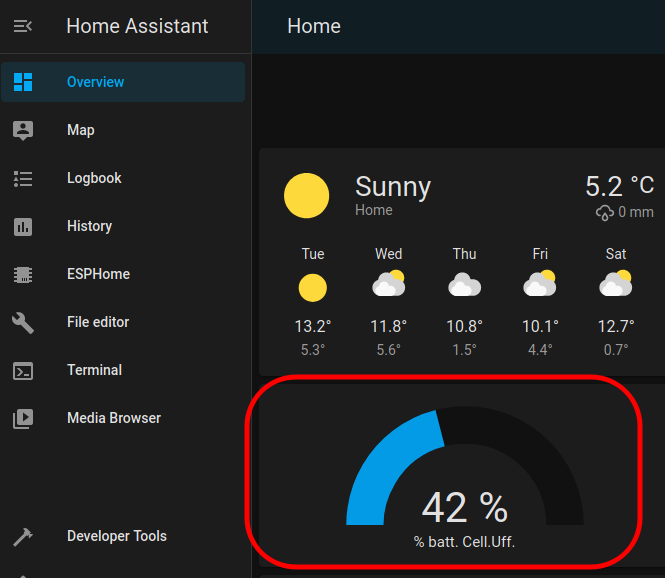
Now in your Home Page you must see something like below.
Home Assistant APP
There is the APP Home Assistant available for Android and IoS.
NOTE, we use Android and all the functionality are available, seems that on IoS not all the functionality are available.

Thank to this APP you have on your mobile phone the same functionality that you have on your PC.
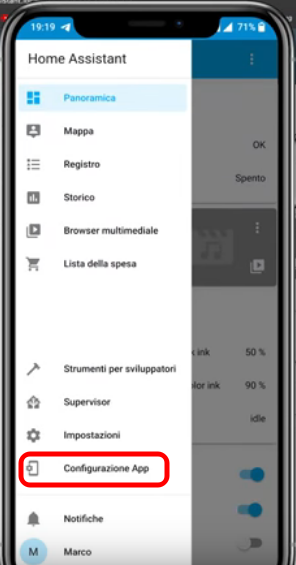
Very useful is that you has the possibility to enable the sensors present on the mobile phone to send info to your HA.
For do this tap on the icon show below.

Now select the Configure App by pressing on the icon show below.
In the page that appears you will see a long list of sensors that you can or not enable.
Useful is enable the battery status and the position (GPS) of your mobile phone for create various automations in HA.
If you use access to your HA via Duck DNS see here (at the end of page).
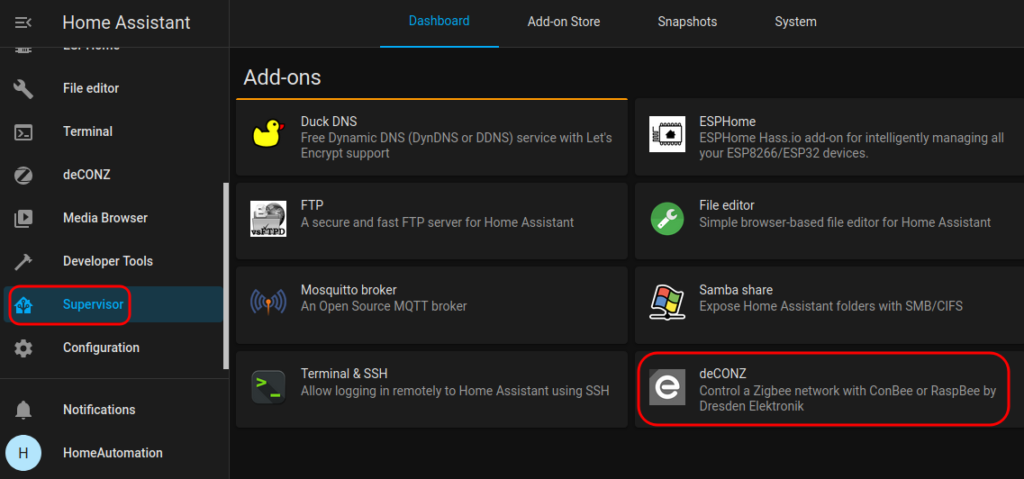
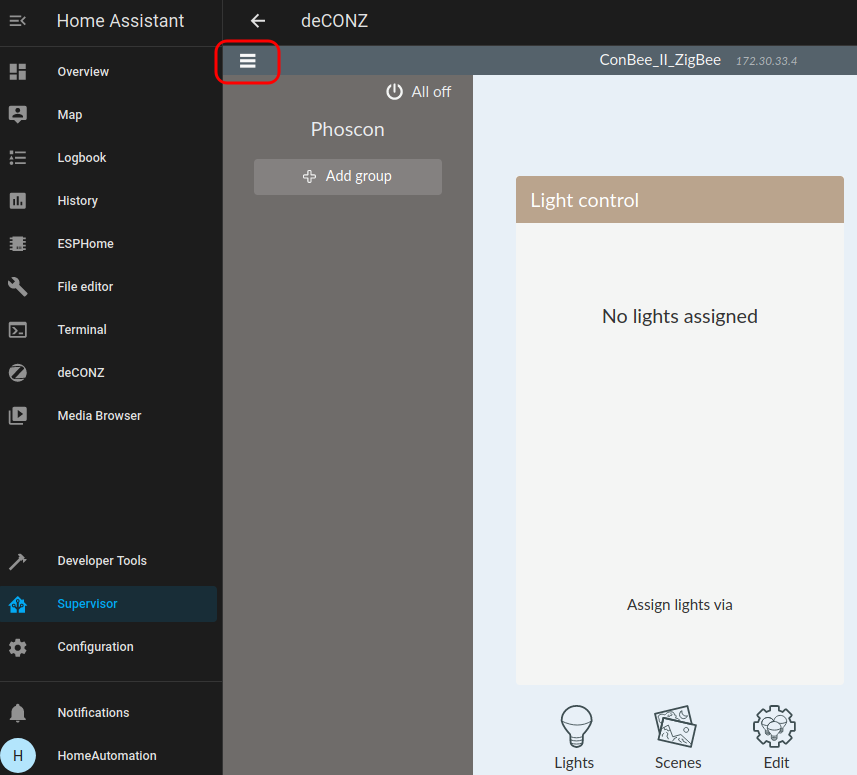
Add-ons or Plug-in (deCONZ drive installation for ZigBee)
Add-ons or Plug-in are present in Supervisor icon and are necessary for drive or enable some HW or SW functionality.
For install a new Add-ons click on the Add on Store.
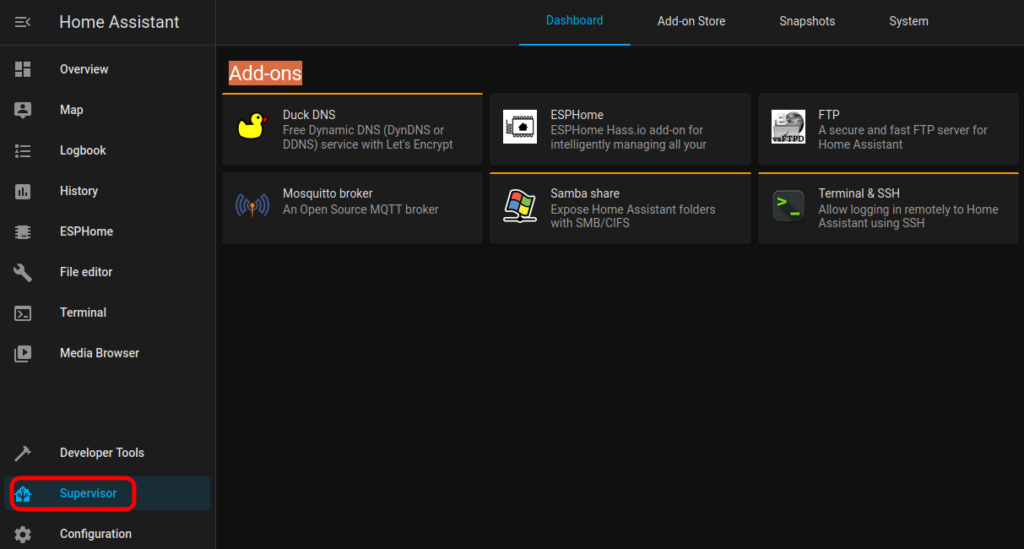
Add-ons Store is the official store but there is also the Home Assistant Community Store (HACS) with a loot of non official Add-ons.
Below there is a list of interesting Add-ons.
- Duck DNS – Useful for connect our HA from remote (via Internet).
- ESPHome – is add-on for intelligently managing all your ESP8266/ESP32 devices.
- Mosquitto broker – An Open Source MQTT broker.
- File editor – Simple browser-based file editor for HA.
- FTP – A secure and fast FTP server for HA.
- SSH & Web Terminal – SSH & Web Terminal access to your HA instance. Terminal & SSH – Allow logging in remotely to HA using SSH. Is a classic terminal of Linux similar to SSH & Web Terminal.
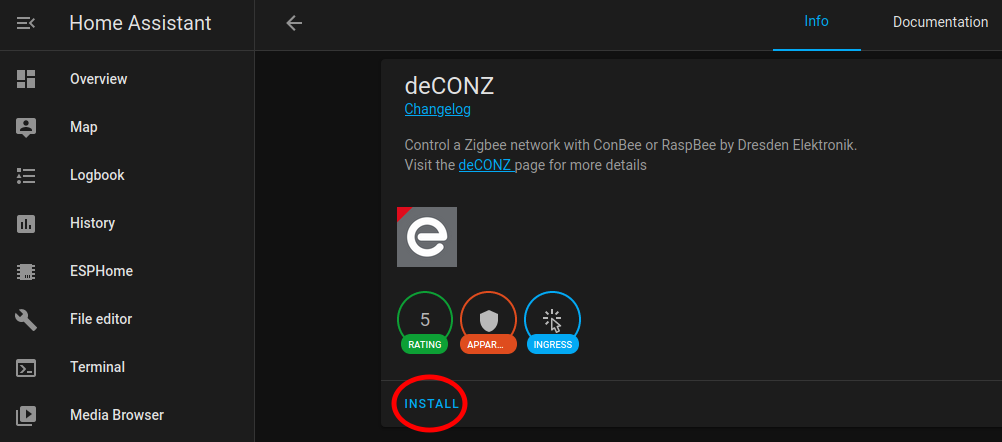
- deCONZ – Control a Zigbee network with ConBee (RaspBee by Dresden Elektronik).
- For the ZigBee devices is necessary a bridge (ZigBee/WiFi) and we suggest to use the ConBee that is a USB key (must be inserted in our Raspberry).
For install an Add-ons, choose the Add-ons that you need to install and press the button: INSTALL
and be patient.
See below the example of deCONZ drive installation for gave access to Home Assistant to the ZigBee sensors/actuators.
By default Home Assistant interfaces with all WiFi sensors and/or actuators, if you want to open up to the ZigBee world too, we recommend installing ConBee II.
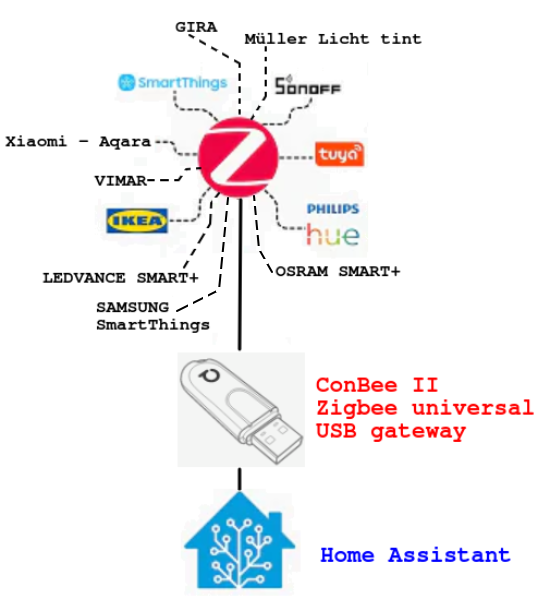
For more info about the compatibility of ConBee II read here.
After the installation you must see a window like below.
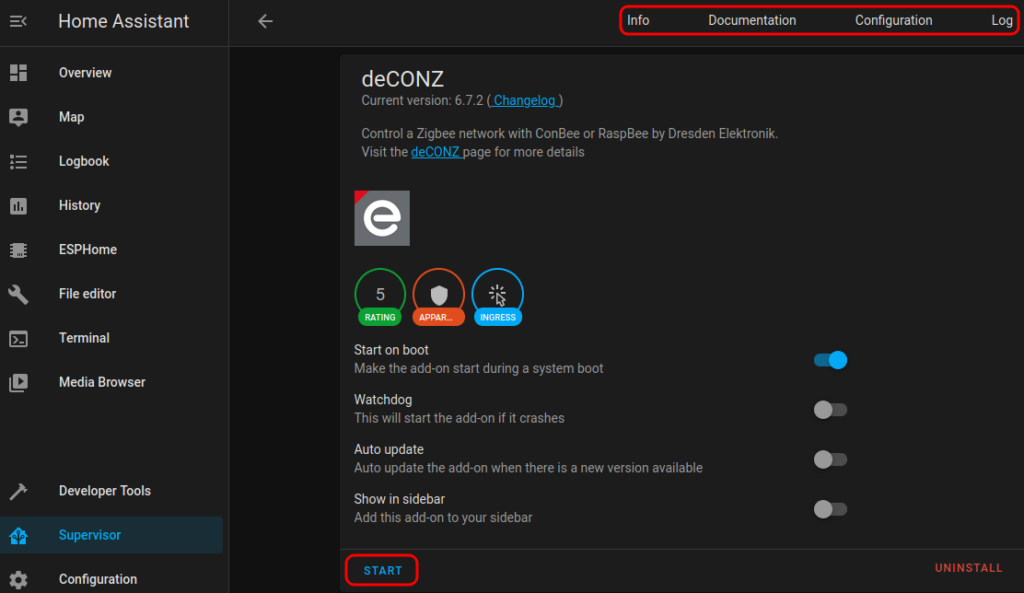
Before to start your new Add-ons is necessary configure it and for do so click on: Configuration
and from the new window that appears configure the Add-ons, in our case is deCONZ and SAVE your configuration.

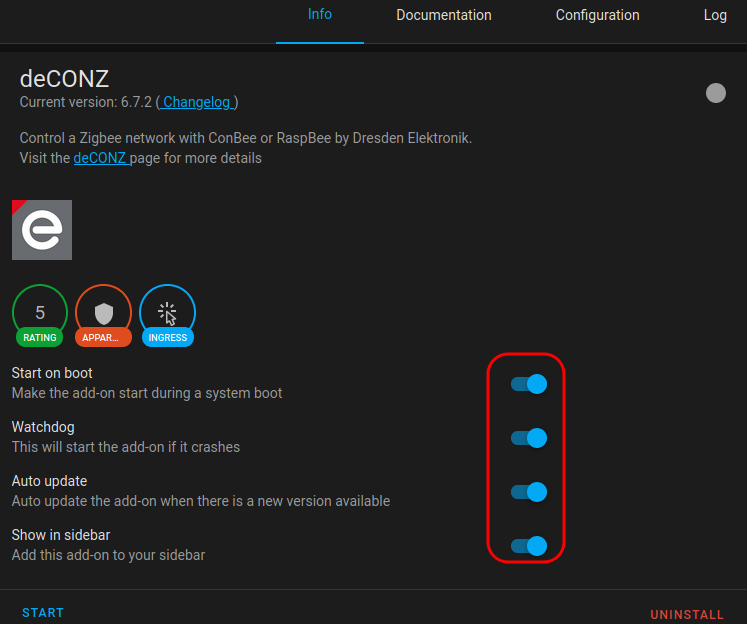
At the end configuration is necessary enable some extra features in the deCONZ home page, see the red box in the image below.
Attention, before to press the START button is necessary connect to your Raspberry the ConBee USB ZigBee key.
Now press START and you must see something like below.
Important is the GREEN led that highlight that the Add-ons works properly, see below.

For more details read: ConBee II, ZigBee USB Gateway
See further on this page.
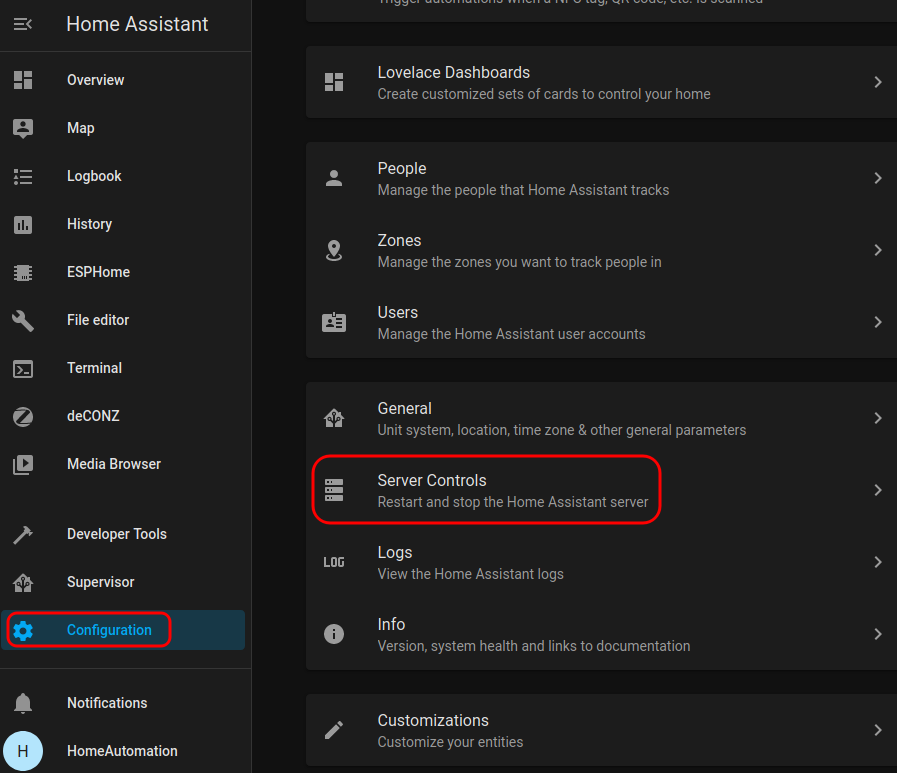
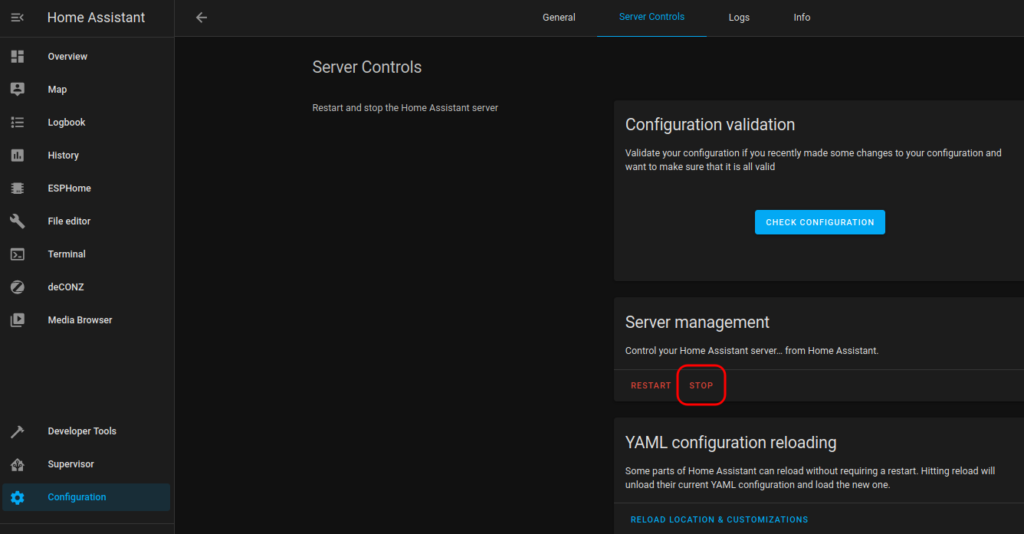
Turn Off your Raspberry/HA
Remember that your Home Assistant is working on a Raspberry which is a computer and therefore it should NOT be turned off by simply removing the power supply because it is not good for the Raspberry.
For turn off your Raspberry/HA do this:
- Go in CONFIGURATION
- Choose SERVER CONTROLS and press on STOP
- After 1…2 minutes remove the power supply to your Raspberry
ConBee II, ZigBee USB Gateway
ConBee II, is USB Gateway to Zigbee but there are a loot of similar USB/ZigBee gateway, see for example here.
We decide to use in our HA the ConBee II because is very easy to install and because on Internet there are a loot of positive recension.
For use the ConBee II insert it in your Raspberry.
NOTE
In case of problems shutdown and restart your Raspberry.
This is a safety procedure to be sure that your Raspberry linking correctly the ConBee II.
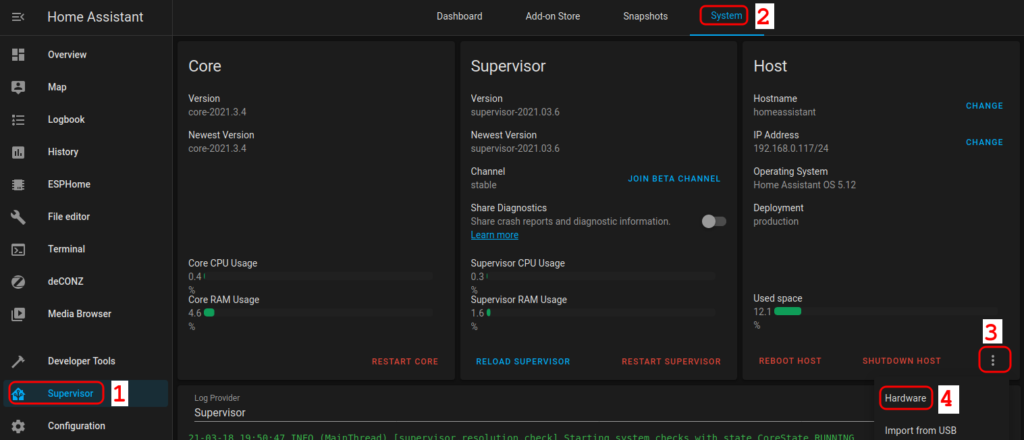
For install the drive for ConBee II click on SUPERVISOR, next click on ADD-ON STORE and find deCONZ, for more dettail see deCONZ installation.
Now click the SUPERVISOR button and you must see the deCONZ icon that is grey this because is necessary configure it and start it.
See the image below.
Click on the deCONZ icon and from the page that appears click on DOCUMENTATION to see how to use deCONZ.
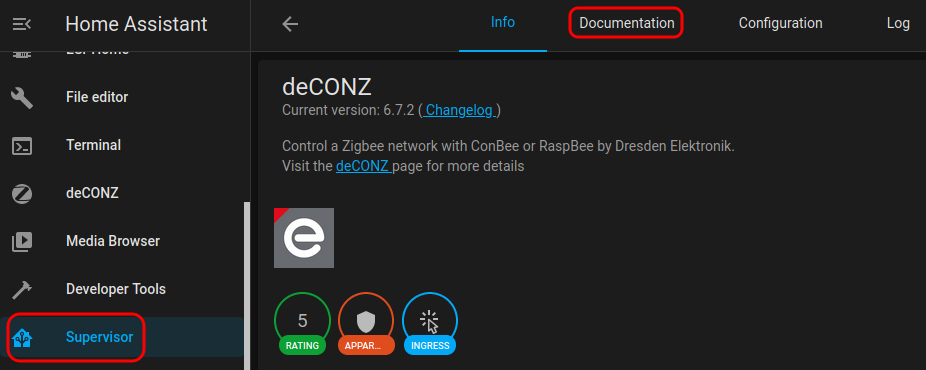
In the documentation, section Configure the add-on, tell us that is necessary select:
Supervisor -> System -> Host system -> Hardware
for know the name of our ConBee II.
See the image below.
Now, from the page that appears do this:
- press: CTRL + F
- and type: ConBee
You must find the ID_MODEL and the devserial/by-id/…
copy this line.
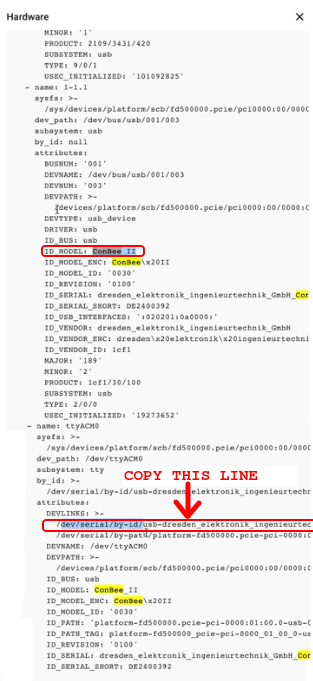
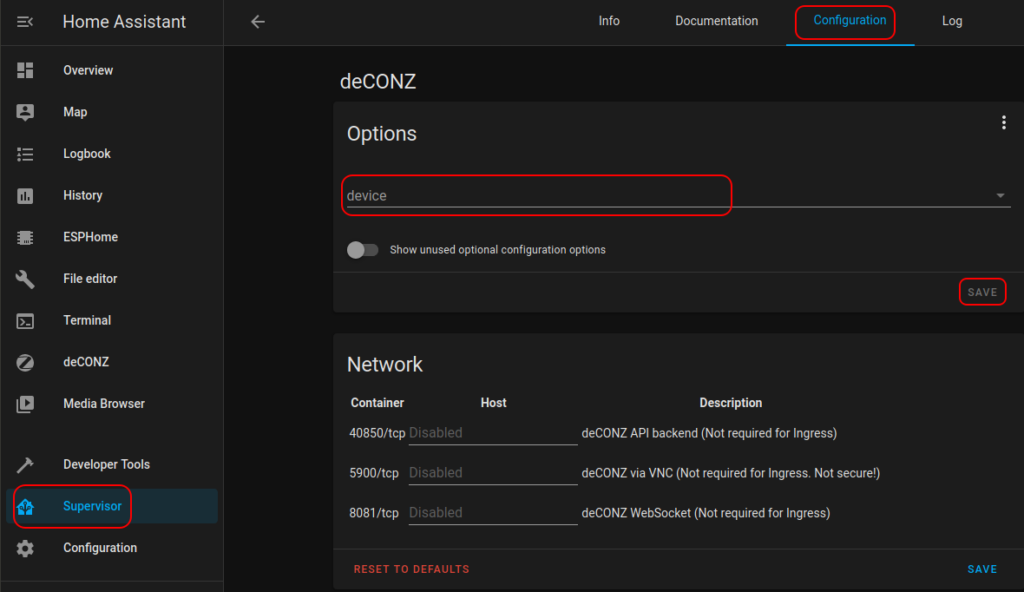
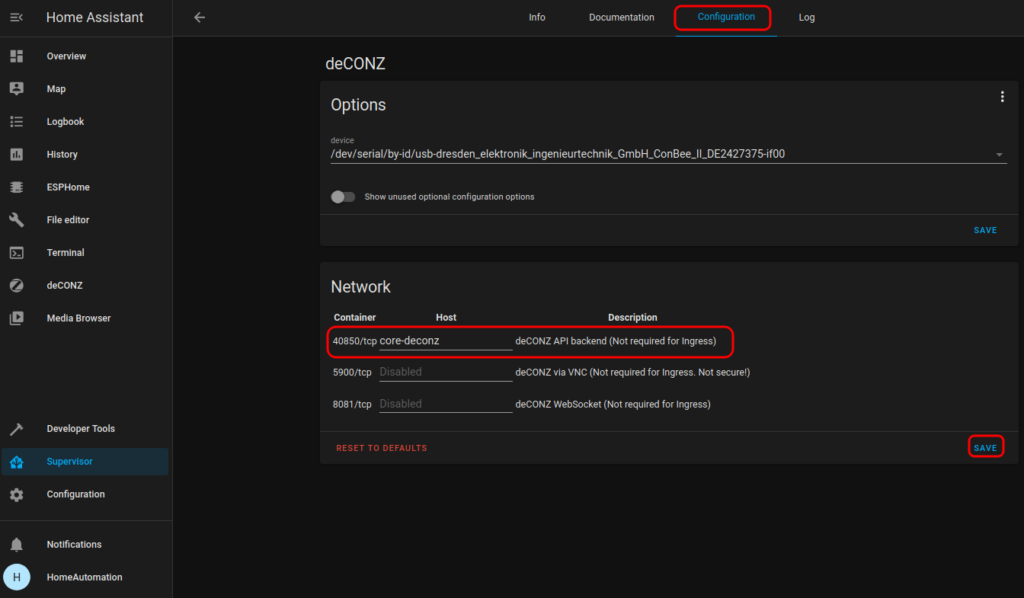
Now back to: Supervisor -> Configuration
and paste in the device the line copied before and SAVE the configuration.
For example:
/dev/serial/by-id/usb-dresden_elektronik_ingenieurtechnik_GmbH_ConBee_II_DE2427375-if00
Remember to press SAVE button before exit.
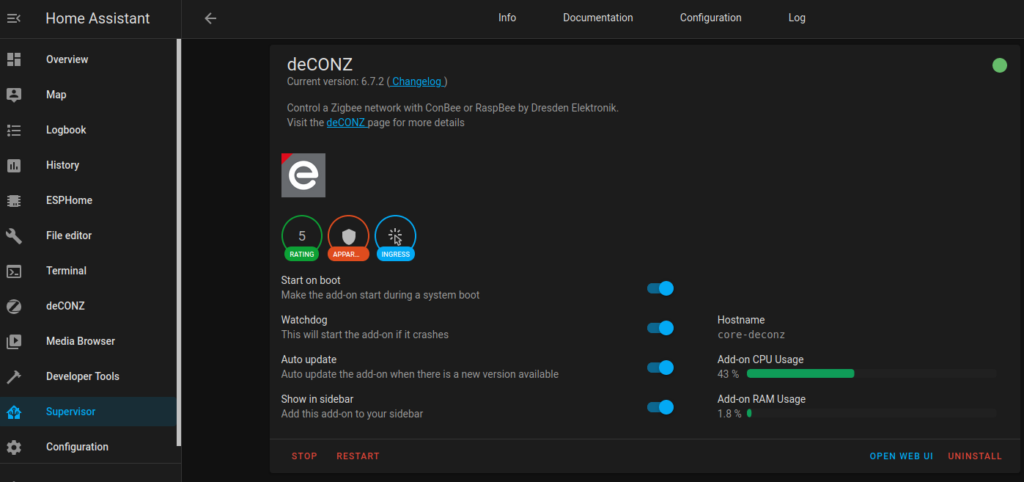
Now back to:
Supervisor -> deCONZ
and configure the page as show below and press START.

After to press START button you must see a new page like below.
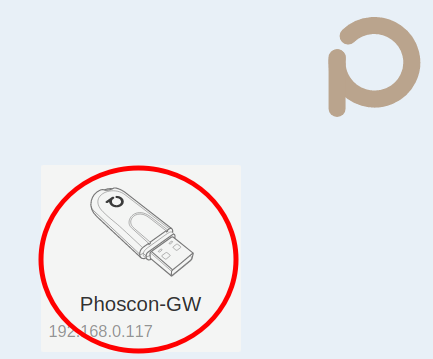
Now press the button:
OPEN WEB UI
From the new page press: PHOSCON
and select the: Phoscon-GW
See below.
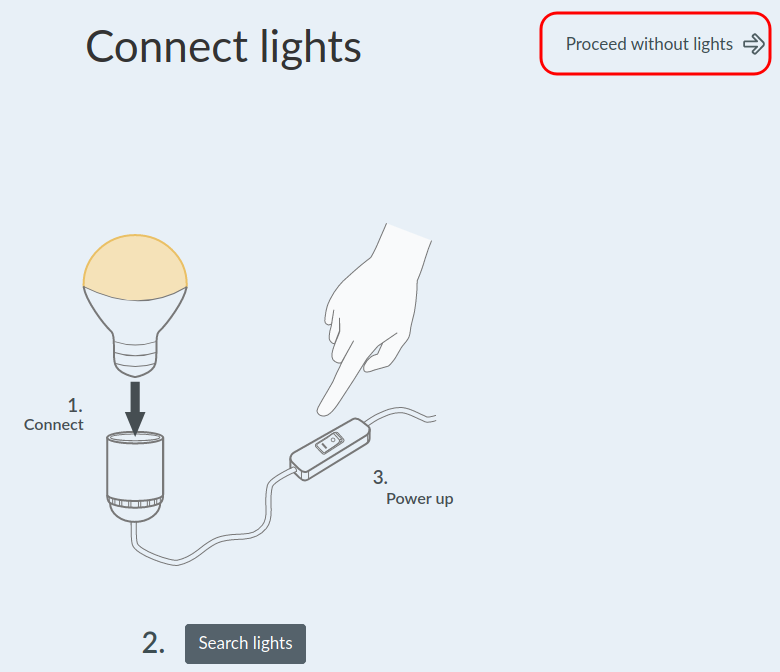
From the new page that appears insert a Gateway NAME and a PASSWORD and press NEXT

From the new page that appears select: Proceed without lights
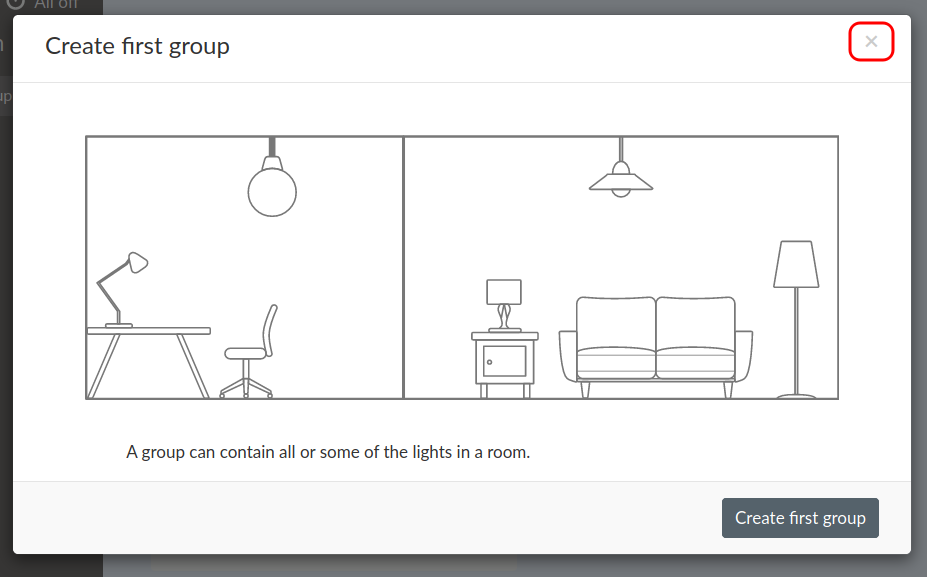
And from the new page that appears skip the creation of first group by press X, see below.
OK, now you must see a page like below.

Now the installation of our usb ConBee II is OK and we are ready to link our ZigBee devices.
If you need to see your ZigBee network connections select:
deCONZ -> deCONZ
and you must see some like below, of course this is our ZigBee network.
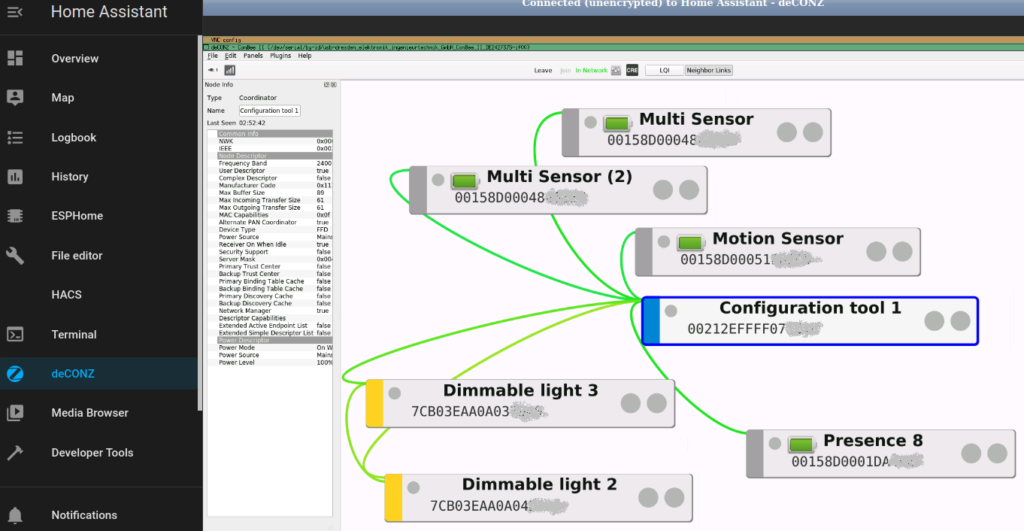
See also here.
How to integrate Osram Smart+ (LED bulb Zigbee) in Home Assistant
Please see here.
SHELLY 1 how to use it
Please see here.
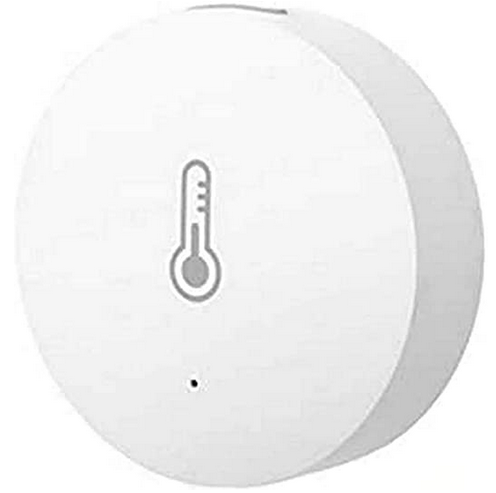
XIAOMI Temperature and Humidity sensor
We add to our ConBee II the XIAOMI Temperature and Humidity sensor (X-YTC4042GL).
Remember to enter in:
deCONZ -> PHONSCON -> ConBee_II_ZigBee -> Proceed without lights -> CLOSE (X) the Create first group -> select the 3 horizontal line on top left of the page -> SENSORS -> and press ADD NEW SENSOR -> OTHER
see below.
Select: the three horizontal lines at the top left, see below.
From the new menu that appears select: SENSORS
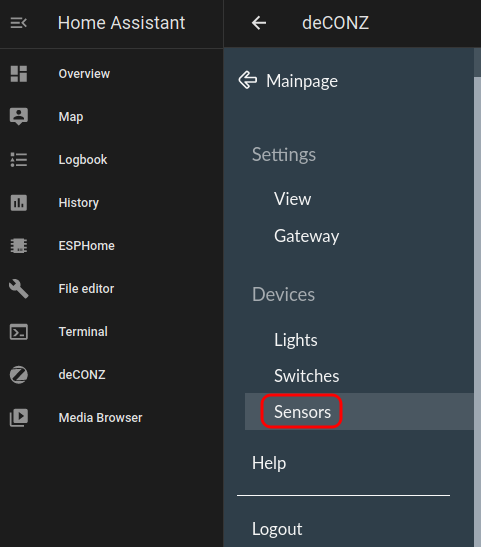
And from the new page that appears select: OTHER
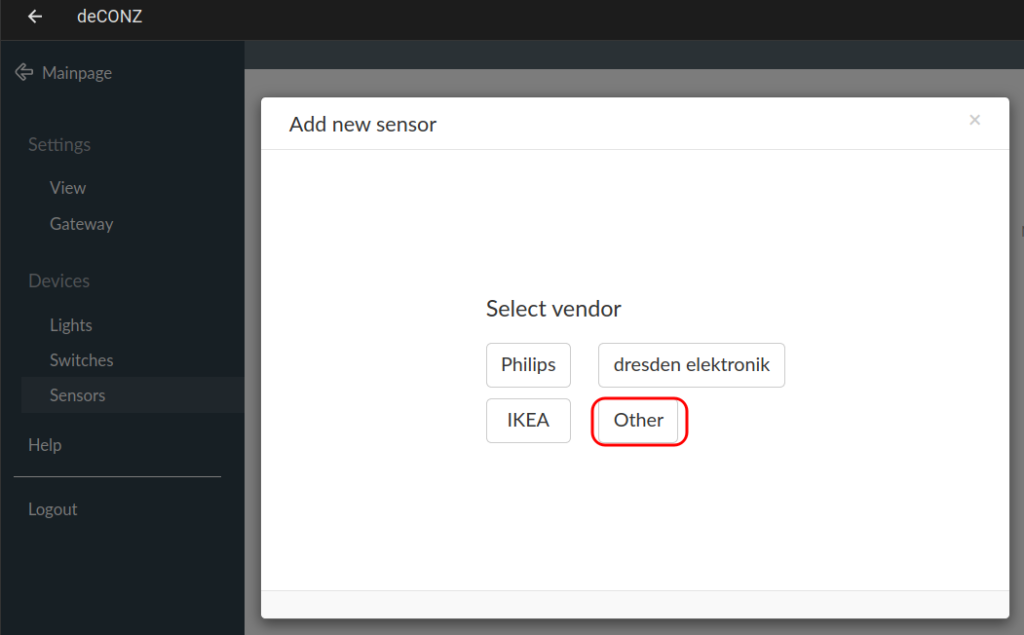
And from the new page that appears select: ADD NEW SENSOR
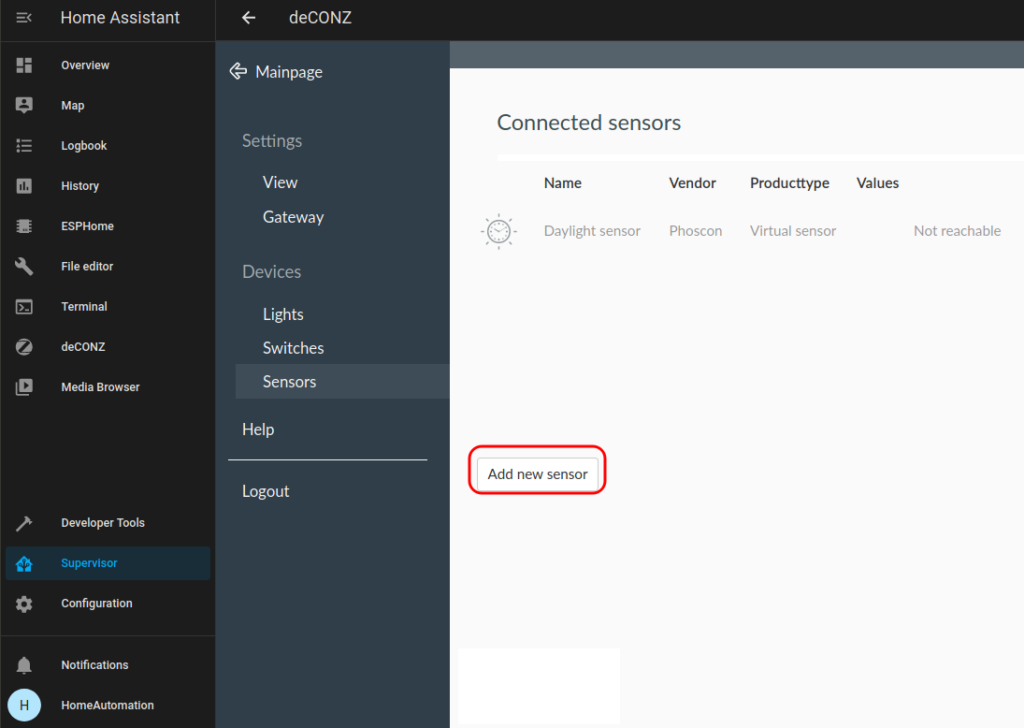
Now you need to pair the XIAOMI Temperature and Humidity sensor (X-YTC4042GL) to the key ConBee II.
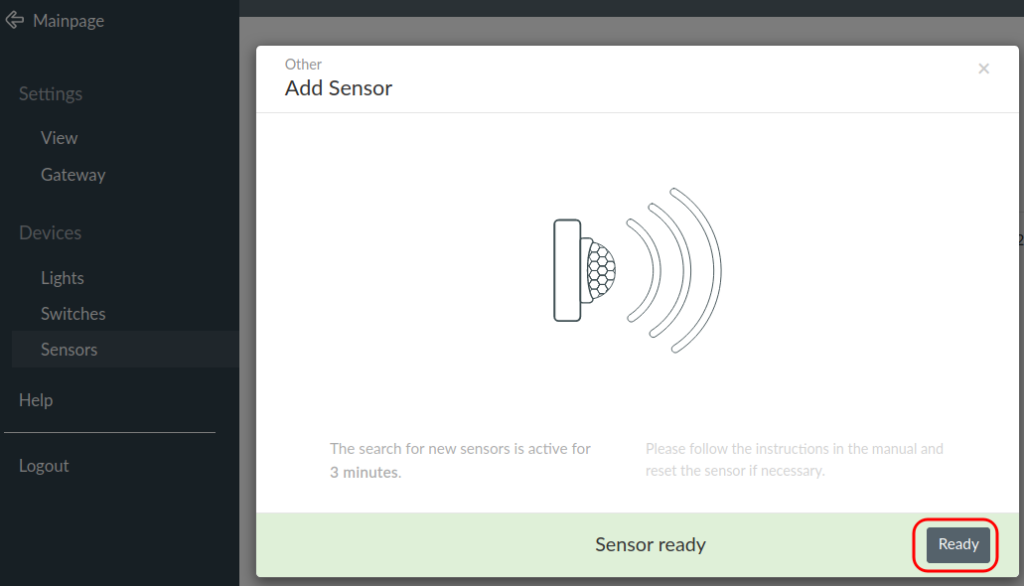
It’s easy, press for 2…4 seconds the RESET button present on the XIAOMI Temperature and Humidity sensor, release immediately the button upon see a led flashing.
Wait until the led end to flashing and you must see something like below, this means that the pairing is done.
Now press READY, see below.
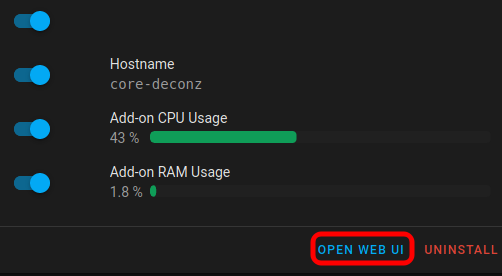
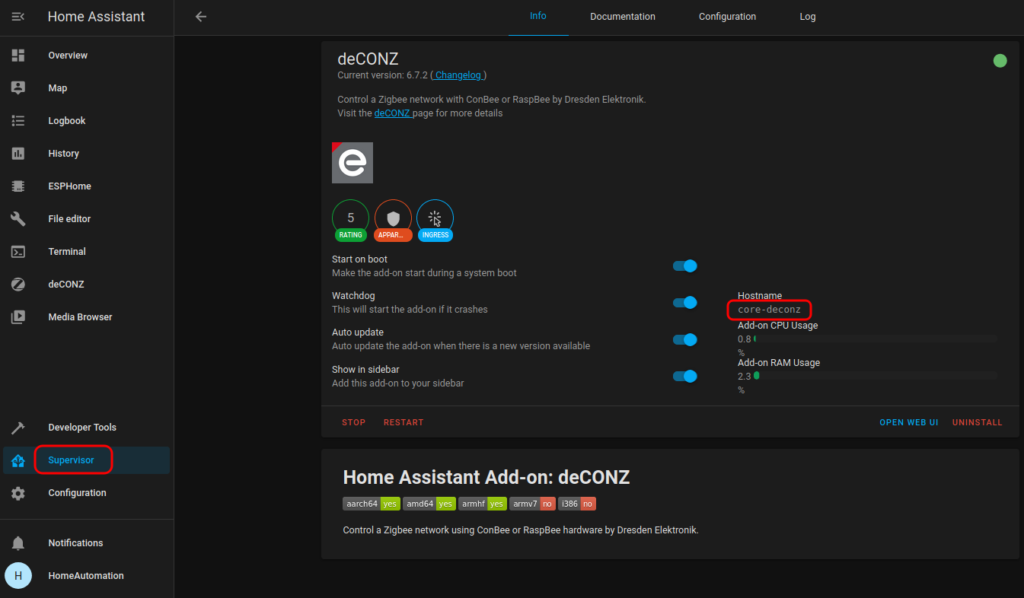
Now back to: SUPERVISOR -> deCONZ
and copy the: HostName
see below.
Now select the (deCONZ) tab: CONFIGURATION
and write in the deCONZ API… the hostname copied precedently (core-deconz) and press SAVE & RESTART. See below.
Now select: CONFIGURATION -> INTEGRATION
And you must see the deCONZ icon, see below.
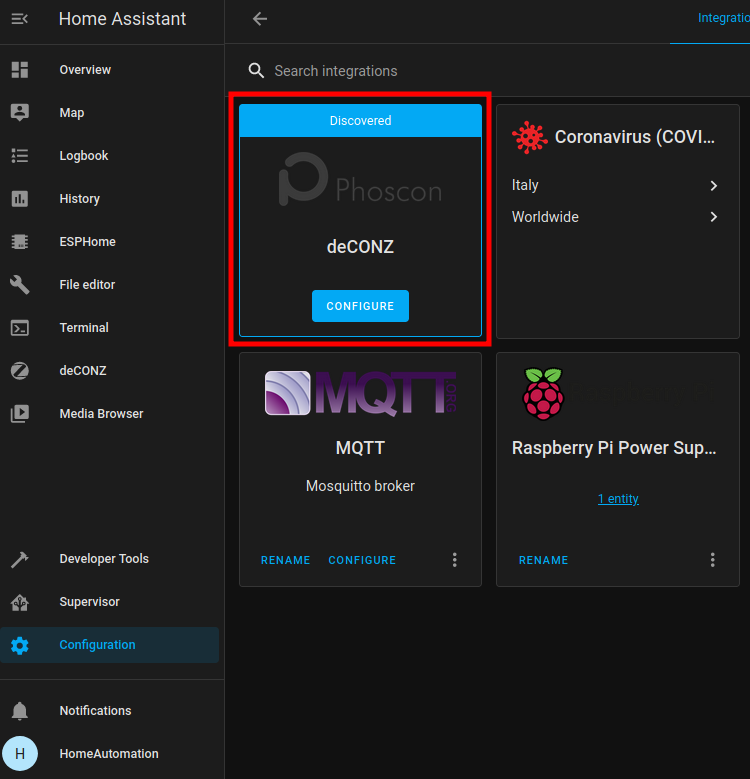
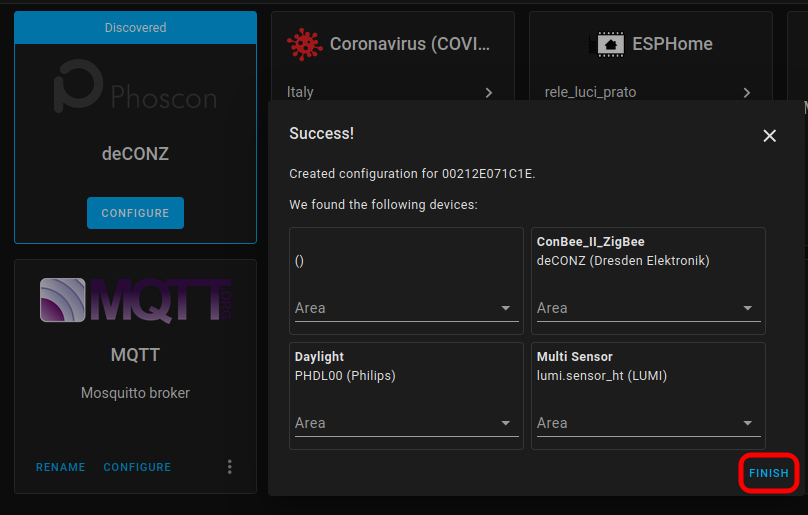
Now press CONFIGURE
and from the pop-up that appears select: FINISH
Now select:
SUPERVISOR -> deCONZ -> OPEN WEB UI -> PHOSCON -> Select the three vertical line (top, on left) -> GATEWAY -> ADVANCED
and here there is the button: AUTHENTICATE APP
Now select:
CONFIGURATION -> INTEGRATION
and from the PHOSCON (deCONZ) icon select:
OPTION
and flag the:
Allow deCONZ CLIP sensors
and press:
SUBMIT
see below.

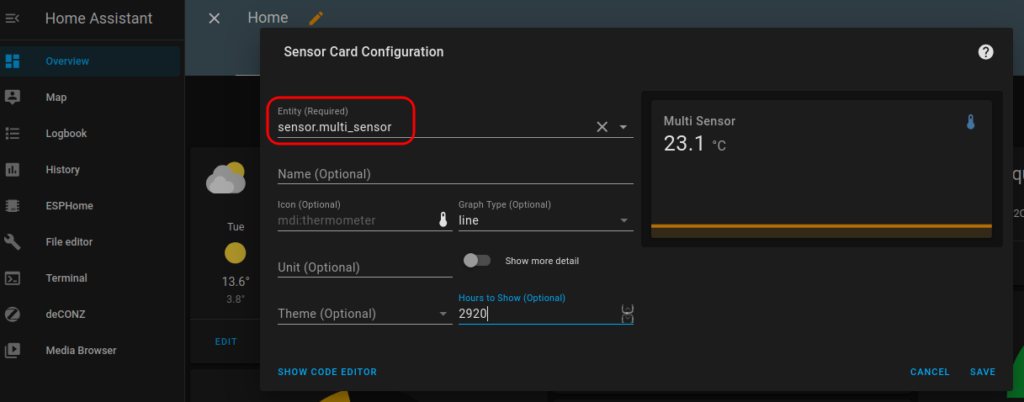
Now you can enter the new sensor data in the HA homepage (OVERVIEW), see explanation below.
Select:
Overview -> the 3 vertical points (on top in the right of the page) -> EDIT DASH BOARD -> ADD CARD -> SENSOR -> sensor.multi_sensor (for temperature)
See below.
XIAOMI Motion Sensor (PIR sensor)
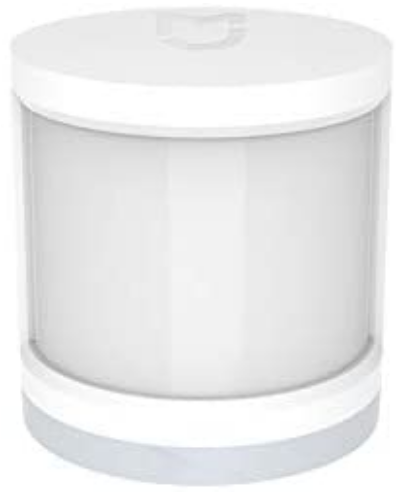
The Xiaomi MI Motion Sensor is a very smart low price PIR sensor.
This sensor use the ZigBee protocol so we use the ConBee II USB gateway connected to our Raspberry, for detail about the ConBee II installation see here.
For install the Xiaomi Motion Sensor select:
SUPERVISOR -> deCONZ -> OPEN WEB UI -> PHOSCON -> CONBEE II ZIGBEE -> Three horizontal lines at the top left -> SENSORS -> ADD NEW SENSOR -> OTHER
and now press the reset button on the Xiaomi Motion Sensor for 3…5 sec until it flashing in blue and release the reset button.
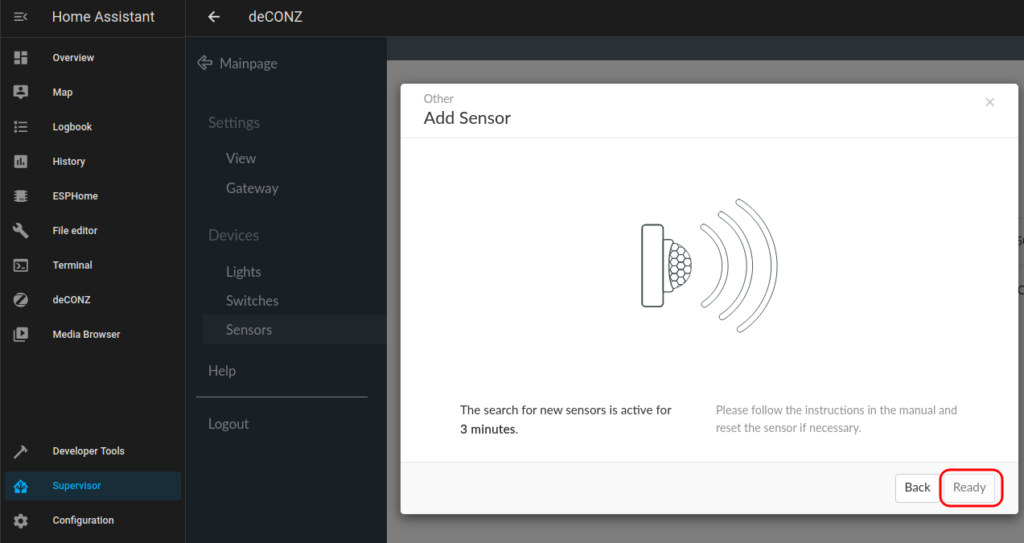
After a few seconds the Xiaomi Motion Sensor LED stops flashing and the READY key will be active, press it and you should see an image similar to this below.
Now your Xiaomi Motion Sensor is linked to your USB ConBee II Gateway.
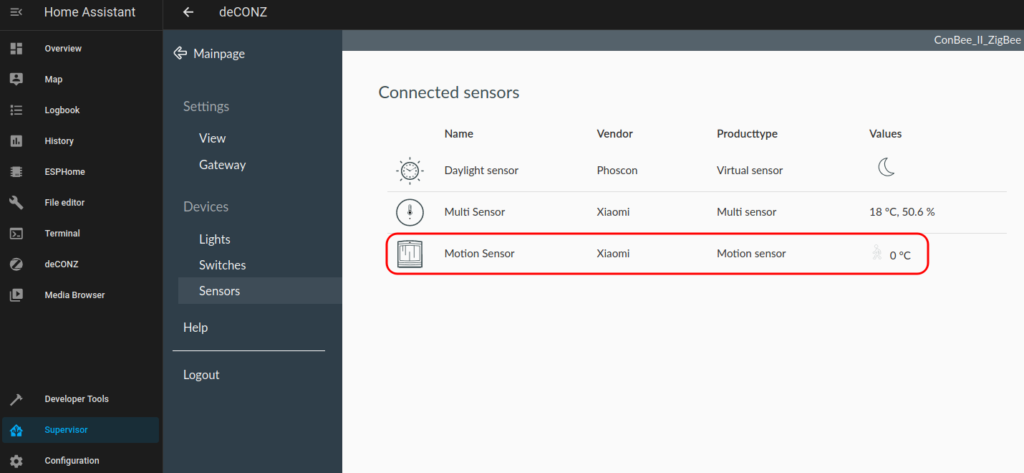
For see in your HA the status of your Xiaomi Mi Motion Sensor see below.
See Xiaomi Mi Motion Sensor status.
Select:
OVERVIEW -> Three vertical dot on top right -> EDIT DASHBOARD -> ADD CARD -> ENTITY ->
and now select the sensor: MOTION SENSOR (binary_sensor.presence_4), see below
and from the page that appears insert a NAME (if you want) and SAVE the configuration.
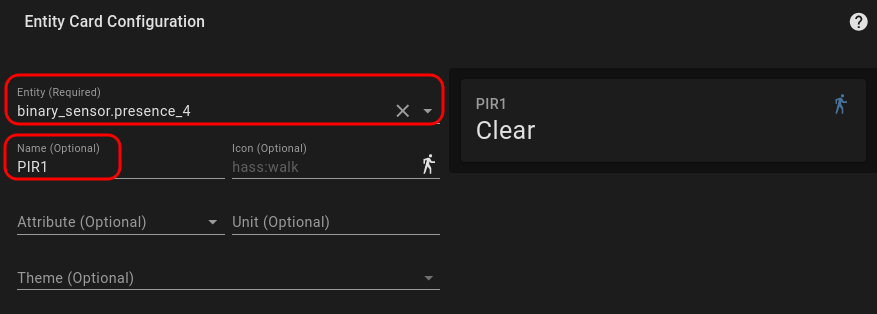
Now in the HA Overview page (the main page) you must see something like below.

The image above indicates that the sensor has not detected any movement.
Now move yourself in front of the sensor and you must see an image like below.
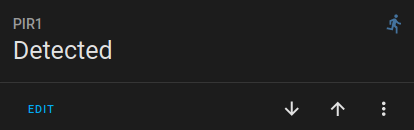
After about 1.30 min, if the sensor does not detect presences, the display will return with the writing: CLEAR
See Xiaomi Mi Motion Battery status.
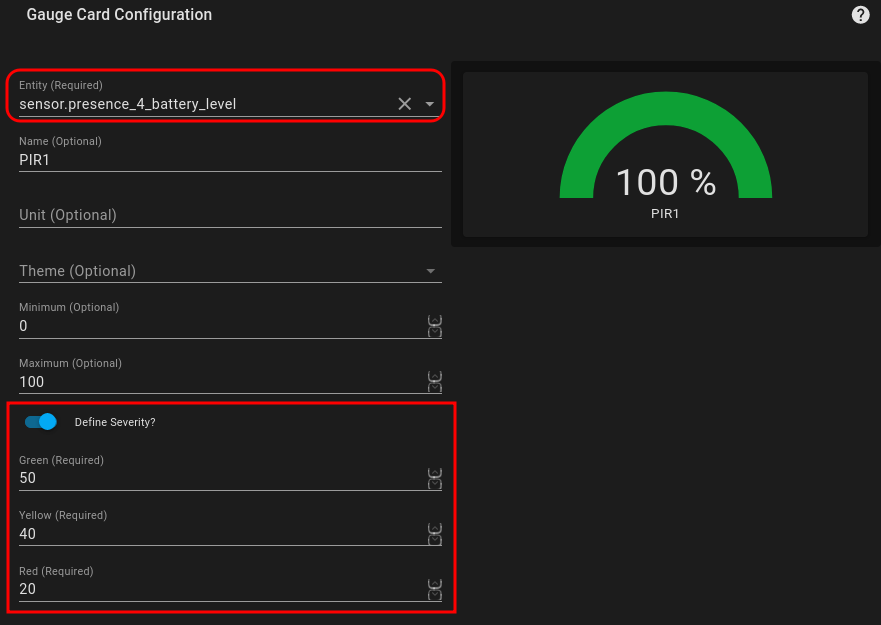
Select:
OVERVIEW -> Three vertical dot on top right -> EDIT DASHBOARD -> ADD CARD -> GAUGE
and now select the sensor: MOTION SENSOR BATTERY LEVEL (sensor.presence_4_battery_level), see below
and from the page that appears insert a NAME (if you want) and SAVE the configuration.
See the image below.
Last but not list, for know how to change the battery see this video.
XIAOMI Mi Windows and Doors Sensor
Please see our dedicated page that is here
Third party add-on or plug-in for Home Assistant (HA)
Please see our dedicated page that is here.
Introduction to Home Assistant (HA) Automations
Please see our dedicated page that is here.
How to enable some automation only during the night
Please see our dedicated page that is here.
XIAOMI – AQARA, sensors & actuators + ConBeeII ZigBee gateway
Please see our dedicated page that is here.
File Editor
The file editor is used to access the various configuration files, automation, etc, of Home Assistant.
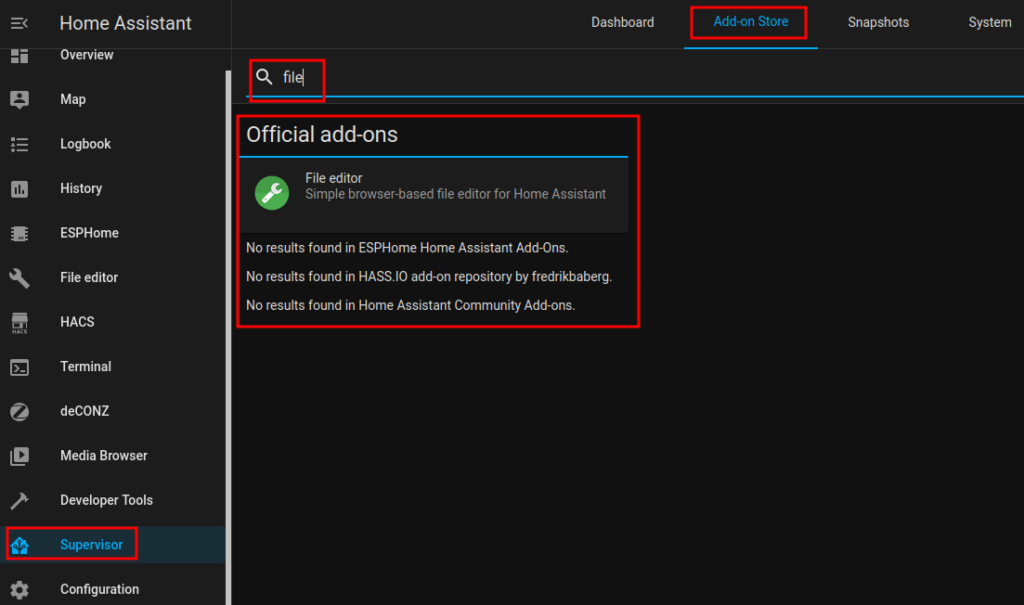
There are several file editors but we recommend: FILE EDITOR
which you find here: SUPERVISOR -> ADD-ON_STORE
and search file
and install it, see below
Remotely access to Home Assistant (from Internet)
Please see our dedicated page that is here.