–
![]()
Contents
–
Introduction
We using different IP Cameras, seems to easy install its but is not true.
Normally the first installation work well but if you change your Internet Provider or update the IP camera SW, born a problems !
Also if you install a WiFi repeater or Switch ethernet sometime born some problems.
Below there is a list of things to control for resolve IP Camera problems.
–
How to discover the IP Cameras present in your Network
For discovery the IP Cameras present in your local network (Home, Office, etc), there are different possibilities that are:
For Linux, Windows and Mac, there are a lot of, IP Scan software that analyze your network and show the active IPs that they found.
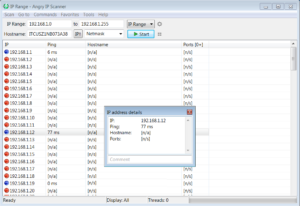
Some of this SW are free, see for example Angry IP Scanner.
Below there is an example of scanner.
NOTE, under linux we suggest to use the command: nmap
see here.
More easy is use your phone after you had install the app: FRING NETWORK TOOLS
Fring is available for Android and IoS.
For Android see here.

Below there is an example of Fring scanning, in the red boxes there are the IP number or IP address, of the IP Cameras.

Know the IP number or address of our IP Camera is a first step necessary for configure in the right way our IP Cameras.
After you have find the IP Number, for access to your IP Camera is necessary open a browser (Firefox, Chrome, Internet Explorer, etc) and type in the IP Number, see below.

ATTENTION:
Suppose that you use a Foscam Camera and you find it at the address: 192.168.1.93
For access to the IP camera web page is necessary write in the browser:
192.168.1.93:93
the :93 is the HTTP PORT assigned to your IP Camera during the first configuration.
You can find this HTTP PORT in your APP that you use on your phone. See below.

For DLINK DCS-930L is necessary only write in the browser the IP Number that you find using the FRING NETWORK TOOLS.
For some more modern IP Camera is necessary us HTTPS protocol.
Suppose that you find your modern IP camera at the address: 192.168.1.35
in your browser you must type: https://192.168.1.35
ATTENTION:
If you uses a lot of IP Camera in your home, office, etc, remember that every IP Camera must have a unique address of HTTP PORT and MEDIA PORT.
–
DHCP service
All the IP Cameras that you install in your house or office (via WiFi or Ethernet cable), are connected to your router (Ethernet Modem), thanks to DHCP service that assign a unique ID number to your IP Camera.
The problem is that this ID number me be change if you power down your IP Camera or your Modem.
So it’s recommended to don’t use the DHCP but assign a static IP number.
For assign a static IP number to your IC Camera it’s necessary enter in the menù of your IP Camera and find a menù normally called:
IP CONFIGURATION or DHCP CONFIGURATION.
Below there is an example of the nemù present in FOSCAM model FI9818W.

–
DDNS
All the IP Cameras vendors offer a free DDNS service for see your IP Camera over the world.
There is the possibility that this free DDNS after some years, especially if you use a old IP Camera will be suspend.
If you is in this situation you can configure a new DDNS service.
There are some free DDNS on web, see for example the: NO-IP
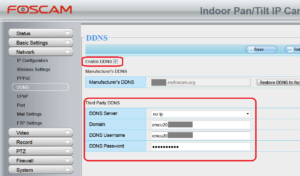
For change the DDNS of your IP Camera you must search in the web menù of your IP Camera a tab named: DDNS or Dynamic DDNS
See below.
ATTENTION:
Some Internet Provider has a particular restricted network that cause a problem to use the DDNS.
In Italy FastWeb and EOLO has this problem.
Fortunately both, FastWeb and EOLO, release for free the public IP for the user that request it.
Thanks to public IP is possible see our Web Modem (our office, home, etc) ower the world.
Thank to this is possible access to our IP Camera.
If you has a Public IP you must configure your APP like below.

–
Port Forwarding
For see around the world your IP camera it’s also necessary open web modem ports, this is called Port Forwarding.
For do this open your modem web interface and search a menu called:
Port Forwarding or Port Mapping.
Below there is an example on the FastWeb modem (FastGate).

–
GMAIL configuration for Motion Detection
For configure the GMAIL for application like Motion Detection see the image below.

NOTE:
- Use FIREFOX or CHROME for a clear view of the images present in this web site
- For enlarge the image press: CTRL +
For reduce the image press: CTRL –