
In this tutorial we explain what to do, for import in Atollic TrueSTUDIO for STM32 a project developed for AC6 (System WorkBench – SW4STM32)
We use an example developed using CUBE for AC6 based on NUCLEO-F030R8.
Our simply example do a flashing led present on the NUCLEO-F030R8 and the name of our project is TST1.
Our working directory is: E:\0_NUF030AC6\
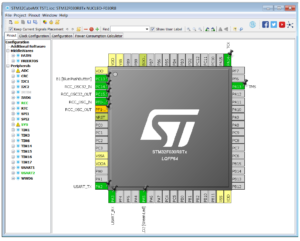
We configure the STM32F030R8 by CUBE as shown below.
Here there is the Cube project.
We generate the project for AC6 in the working directory: TST1
and we have the files/directory shown below.

NOTE:
In the main.c insert after:
/* USER CODE BEGIN 3 */
the two line below for flashing the LED
HAL_GPIO_TogglePin(GPIOA, GPIO_PIN_5);
HAL_Delay(300);
OK, now we want to import this project for AC6 into Atollic TrueSTUDIO for STM32.
To do this, follow the steps below.
- First go in the TST1 directory and click by the right mouse button on the file: .project
from the window that appear choose: Open With
and associate the .project to: TrueSTUDIO.exe
that, in Window 7, is in the directory:
C:\Program Files (x86)\Atollic\TrueSTUDIO for STM32 9.0.0\ide
Look the image below.

- Do the same for file: .cproject
– - Now double click on the .project for start Atollic TrueSTUDIO for STM32.
From the window that appear select the working directory that in our case is: E:\0_NUF030AC6
– - A new window appear that explain us that a conversion of format is necessary, answer OK. (See below).
–

– - At the end of the conversion a new window appear that remember us that are necessary some manual settings, see below.
–

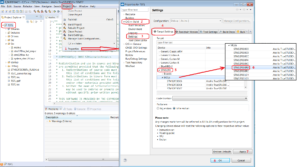
– - Now is necessary inform the compiler that we use the STM32F030R8, for do this do the steps shown below.
Project -> Properties -> C/C++ Build -> Settings -> Target Settings -> STM32F0 -> STM32F030R8
–
– - Now compile the project and you must see something like below.
–

– - Now is necessary choose the emulator ST-LINK-v2, see the steps below.
- Click on icon: Configure Debug
- From the window that appear press the mouse button twice in quick succession, on the option: Embedded C/C++ Application
- Next click on Debugger option and choose the: ST-LINK–
–

–
That is all, now you are ready to compile and debug your project imported from AC6.