–

Counting Modes
Normally a basic timer counts from zero to a given Period value.
General purpose and advanced timers can count in other different ways, as reported in Table below.

The Figure below shows the three main counting modes.

In this example we show you how to use the Timer as a Counter to detect an input after certain number of events.
For example we will count the pressure of button and, after five pressure of the button, we will change the status of the led.
For do this example we use the NUCLEO-F401RE , CUBE-MX and ATOLLIC.
The Timer that we use is TIM1.
We create a working directory for this project named: F401REnuTimCount
- First run CUBE-MX and generate a new project choosing the NUCLEO-F401RE, see below.
–
 When appear the window below select: YES
This will initialize the peripherals used on the NUCLEO-F401RE
–
 –
–
–
- Now open the PINOUT tab and disable the HSE input, se the red box below.
–

–
Again, open the TIM1 and select CLOCK SOURCE as ETR2, see below.
–

– - Now click on the CLOCK CONFIGURATION tab and write 84 in the box named: HCLK, see below, then press ENTER.
–
 –
– - Now click on the CONFIGURATION tab, select USART2 and configure it as shown below.
USART2 in this project is not used but we will use it in a new release of this tutorial in the future.
–

–
It’s time to configure a TIMER as a COUNTER.
Select TIM1 (it’s presente in the CONFIGURATION tab) and in the:
PARAMETER SETTINGS tab write 4 in the COUNTER PERIOD…
Now select the NVIC SETTINGS tab and select:
TIM1 UPDATE INTERRUPT AND TIM10 GLOBAL INTERRUPT
see below.
–

– - Now it’s time to generate the code.
For do this select: PROJECT -> SETTINGS
and choose the compiler that you need to use, in our case is ATOLLIC (TrueSTUDIO).
Choose also a directory where save your project, in our case is F401REnuTimCount
See below.
–

–
Now generate the project by pressing on:
PROJECT -> GENERATE CODE
–
Attention:
On some PC, with aggressive antivirus, at the end of the generation of the project, is better to select: CLOSE
because you could block CUBE-MX.
Then we will open the project as indicated in step n.6
–

–
- Start ATOLLIC
Now go in your working directory, in our case is: F401REnuTimCount
Enter in the directory: …\F401REnuTimCount\Tim1Count
and double click on the file named: .project
ATOLLIC start and at the begin, select your working directory, see below.
–

–
Try now to compile your project, you must see somethings like below.
–

–
Well, if you have successfully compiled, now let’s modify the SW to read the Blue Button and turn on the Green LED present on NUCLEO-F401RE board.
–
For do every things we will use the interrupts and the callback for TIM1.
For find the callback ready to use for the Timer open the file: stm32f4xx_hal_tim.c
and search: __weak
You must find the:
__weak void HAL_TIM_PeriodElapsedCallback(TIM_HandleTypeDef *htim)
Copy the:
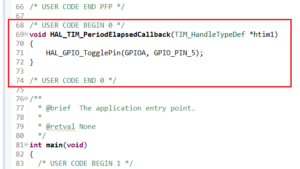
void HAL_TIM_PeriodElapsedCallback(TIM_HandleTypeDef *htim)
in the main.c from:
/* USER CODE BEGIN 0 */
and…
/* USER CODE END 0 */
and added an extra line for toggle the led that is:
HAL_GPIO_TogglePin(GPIOA, GPIO_PIN_5);
see below.
–
–
Now insert from the line:
/* USER CODE BEGIN 2 */
and line
/* USER CODE END 2 */
the start up of Tim1 that is:
HAL_TIM_Base_Start_IT(&htim1); // Start TIM1 under Interrupt
see below.
–

– - It’s time to compile your project.
If you did everything right, you must see something similar to below image.
–

– - For test our project is necessary connect the Blue Button (PC_13) (present on the NUCLEO-F401RE) to the Tim1 input that is PA_12 (TIM1_ETR).
See below.
–

–
Now go into debug and run the program.
–

–

–
Now press 5 times the BLUE Button for turns off the Green LED.
If you press the BLUE Button again for 5 times the Green LED lights up and so on.
–
That is all.
–
How to get the SW for this project
Please send us an email and ask us the password for: TimCount
Please specify also your country and your city, this are only for our personal statistics.
Get the SW clicking here, but remember to ask us the password for open it.
–
Power Supply NOTE:
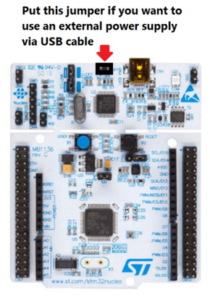
NOTE:
- Use FIREFOX or CHROME for a clear view of the images present in this web site
- For enlarge the image press: CTRL +
For reduce the image press: CTRL –