This demo is similar to the:
STemWIN – graphics demo for STM32F746G-DISCO and AC6
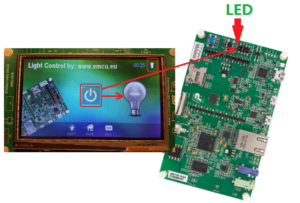
the difference is that when you turn on/off the bulb also the green LD1 is turn on/off.
LD1 is near the RESET BUTTON, on the back of the board.
All is done in the file: Screen1DLG.c
that is located in the SRC directory.
See the #ifdef STEP_5 area that start at line n.397
#ifdef STEP_5
    case WM_PAINT:
        GUI_DrawBitmap(&bmbackground, 0, 0);/*draw background*/
        GUI_DrawBitmap(&bmboard, -7, 64);/*draw board*/

        /*check  if the bulb will be drawn as on or off*/
        if (onoff == 1)
        {
            GUI_DrawBitmap(&bmbulb_on, 329, 74);/*draw bulb_on*/
            HAL_GPIO_WritePin(GPIOI, GPIO_PIN_1, 1);
        }
        else
        {
            GUI_DrawBitmap(&bmbulb_off, 329, 74);/*draw bulb_off*/
            HAL_GPIO_WritePin(GPIOI, GPIO_PIN_1, 0);
        }

        GUI_SetAlpha(191);/*set transparency 75% = 255(100%)-64(25%)*/
        GUI_SetColor(GUI_BLACK);/*set pen colour to black*/
        GUI_FillRect(0, 223, 480, 272);/*draw rectangle for the bottom buttons*/
        GUI_FillRect(207, 95, 271, 159);/*draw rectangle for power button*/
        GUI_SetAlpha(0);/*no transparency*/
    break;
#endif

Here there is the example ready to use for AC6 (SW4STM32).
The file is a ZIP (ARCHIVE FILE) file so you must import it in AC6.
Follow the steps below:
- FILE -> IMPORT -> General -> ARCHIVE FILE
After that, you must import the project: - FILE -> IMPORT -> General -> EXISTING PROJECT INTO WORKSPACE
In this way all path are automatically configured for run on your computer.
Here there is the .bin file to drag & drop (for programing) the STM32F746G-DISCO.