–
This is a quick start guide that explain how to generate a project for Atollic TrueSTUDIO® for STM32, using the CUBE-MX.
- Index
NOTE:
- Use FIREFOX or CHROME for a clear view of the images present in this web site
- For enlarge the image press: CTRL +
For reduce the image press: CTRL –
Start to develop a new project
We suppose that you have installed on your PC all the tools that are necessary for use the STM32 and also the Atollic TrueSTUDIO® for STM32.
Important:
Before to proceed be sure to have the ST-LINK sw up to date, see this tutorial.
For this example we choose to use the STM32VL-DISCOVERY but you choose the STM32 board that you prefer, the concepts are the same for every boards.
Now run the CUBE-MX and do the steps shown below.
In practice select your STM32 board or the STM32 mcu.
Step n.5 request double click on the name of the board for open it.
Alternatively you can select direct the STM32 that you want to use in your project.
Please, remember to allocate always the SERIAL WIRE DEBUG lines:
PINOUT tab -> SYS -> DEBUG -> SERIAL WIRE

–
From the window that appear, if you has select a STM32 board, select YES, see below.
–

Now configure the PINOT, as shown below.

Now configure the CLOCK CONFIGURATION page, as shown below.

Last, configure the CONFIGURATION page, as shown below.

Now is necessary configure the PROJECT -> SETTINGS for generate a project for Atollic TrueSTUDIO, as shown below.

It’s time to generate the project for Atollic.
Select: PROJECT -> GENERATE CODE
At the end of the process you must see the window n.3 (see below), on this window you have the possibility to:
—1) Open Folder
—2) Open Project
—3) Close
On our business PC we have a very aggressive AntiVirus that do not permit to use the option 1 and 2.
So we choose Close and next we go in the directory where was generated the project.

In the directory where you decided to generate your project you must see something like below.

Now press quick double on the .project
From the window that appear choose your working directory and press OK, see below.

Now close the information page that appear, see below.

You must see something like below.
First expand your project (1).
Second expand SRC folder and open the MAIN.C
Third compile your project (3).

Now insert in your project, in main.c, the lines below.
From line n.49
/* USER CODE BEGIN PV */
/* Private variables ---------------------------------------------------------*/
uint16_t DLY=100;
/* USER CODE END PV */
From line n.93
 /* USER CODE BEGIN 2 */
 HAL_GPIO_WritePin(GPIOC, GPIO_PIN_8, GPIO_PIN_SET);
 /* USER CODE END 2 */
From line n.103
/* USER CODE BEGIN 3 */
HAL_GPIO_TogglePin(GPIOC, GPIO_PIN_9 | GPIO_PIN_8);
HAL_Delay(DLY);

if ((HAL_GPIO_ReadPin(GPIOA, GPIO_PIN_0))==1)  // Read Blue Button Status - 1 == Pressed
 {
 ----DLY = DLY * 2;
 ----if (DLY >= 2000)
 ------DLY = 100;
 ----HAL_GPIO_WritePin(GPIOC, GPIO_PIN_9 | GPIO_PIN_8, GPIO_PIN_RESET);
 ----while ((HAL_GPIO_ReadPin(GPIOA, GPIO_PIN_0))==1) // Waiting the release of the Blue Button
  ---{
  --- ---HAL_GPIO_TogglePin(GPIOC, GPIO_PIN_8);
  --- ---HAL_Delay(200);
  ---}
  ---HAL_GPIO_WritePin(GPIOC, GPIO_PIN_8, GPIO_PIN_SET);
  ---HAL_GPIO_WritePin(GPIOC, GPIO_PIN_9, GPIO_PIN_RESET);
  -}

}
 /* USER CODE END 3 */
Rebuild the project by pressing on the icon show below

Now it’s time to debug our work.
Press the DEBUG icom, see below.

In the debug section you must see something like below,

The main control icons of the debugger are shown below.

RUN your program by clicking on the icon: 
Try to push on the Blue Button and see what happen.
The leds must change the flash speed.
How to show a value of a variable ?
It’s easy, do this steps:
—Select the variable
—Click on it using the right mouse button
—From the window that appear choose: Add Watch Expression
—Next press OK
See below.


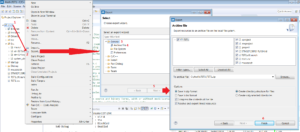
For share your example at other people you must EXPORT the ARCHIVE FILE
Export -> General -> Archive File
Follow the steps below.
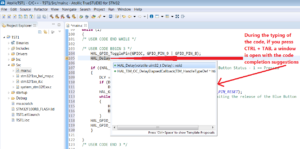
Code completation suggestions
During the typing of the code, if you press CTRL + SPACE, a window is open with the code completion suggestions. See below.
How to get the SW for this project
Please send us an email and ask us the password for: TST1
Please specify also your country and your city, this are only for our personal statistics.
Get the SW clicking here, but remember to ask us the password for open it.